Thursday, June 30, 2011

A Lovely Ohio Stars Quilt

When the Infinite Variety Red and White Quilt Exhibit was at the Armory in NYC in March, this lovely quilt was on display at the American Folk Art Museum near Lincoln Center. 


A close-up of the center. 
 

A corner detail.


A star block with floral print center.


Interesting black and white print fabric in the corners of the blocks.

Tuesday, June 28, 2011

The Last Few "Pages" . . .

Continued from my previous posts, here are the last few pages of my fabric book. 


My portrait and last page. 


 Another photo transfer where I added my photo to a vintage outfit. 

  
The last page, "more . . ." meaning there's more on the back cover. 


The back cover.  Buttons from my collection and a handmade silk ribbon-embroidered moire envelope for treasured photos.


 Treasured family photos with fabric frames.


After I completed my fabric book, I made a separate embroidered fabric pouch where I keep my high school ring, charm bracelet, and a bracelet my brother gave me when he returned from military service.

I enjoyed the challenge of learning new techniques to create "Pages" and had good intentions of making another fabric book but never did.

Monday, June 27, 2011

Still More "Pages" . . .

When I was halfway through my fabric book, I was anxious to keep on going.    


For my children: It's a Boy! and It's a Girl!


Using a rubber stamp and Carter's Micropore stamp pad, I stamped "It's a Boy" in between the blue dots and a floral design around the edges. 


I smocked a 7" x 18" piece of batiste and embroidered a flower. The loose threads from each row were twisted together to form the initials CJS. "It's a Girl" was written on a piece of grosgrain ribbon.


 Our Living Room and Aerobic Dancing.


I used the same turpentine and spoon  method I described earlier to transfer a xeroxed copy of a photograph of our living room onto fabric. Images like this one transfer in reverse.    


 Wonder Under was the solution to fuse pieces cut from a t-shirt to plain fabric.


Barb's quilts and New Jersey Quilts book cover. 


I chose forty-two pieces of fabric representing the quilts I had made and cut them into 1" x 2-1/2" strips. The fabrics were arranged in three rows of fourteen each separated by tape sashing.


Jean Ray Laury's book, Imagery on Fabric became my Bible for many of the techniques I used in transferring images to fabric. One of the more complicated processes was transferring a color image like the cover of the book I co-authored, New Jersey Quilts 1777-1950 but it was well worth the effort.

Sunday, June 26, 2011

More "Pages" . . .

Continued from my previous post "When I Was 50" . . . my fabric book has a total of 18 pages. I chose important events in my life and used various techniques to create the pages. 

   Poem and kindergarten handprint.


The poem my grandfather wrote and illustrated when I was born. I xeroxed the original and placed the copy on several layers of drawing paper on a hard surface and taped the corners to prevent shifting. White fabric was placed on top of the drawing paper with corners taped. I traced the letters with a Pigma Pen and filled in the fancy letters using dots, dashes, etc. 


I pushed modeling clay into the original clay handprint that I made in kindergarten. When the "new" clay hand was removed, I touched up the edges and/or fingers that needed repair and placed it on a piece of drawing paper.  Using a cosmetic sponge, stencil paint was dabbed over the entire hand. Fabric was laid on top of the paint and carefully finger-pressed to ensure a good print. The fabric was removed and when it was dry, I placed the original clay handprint on top of my new print, drew around the circular edge with a Rub-a-Dub laundry marker and then wrote in my name and date.  


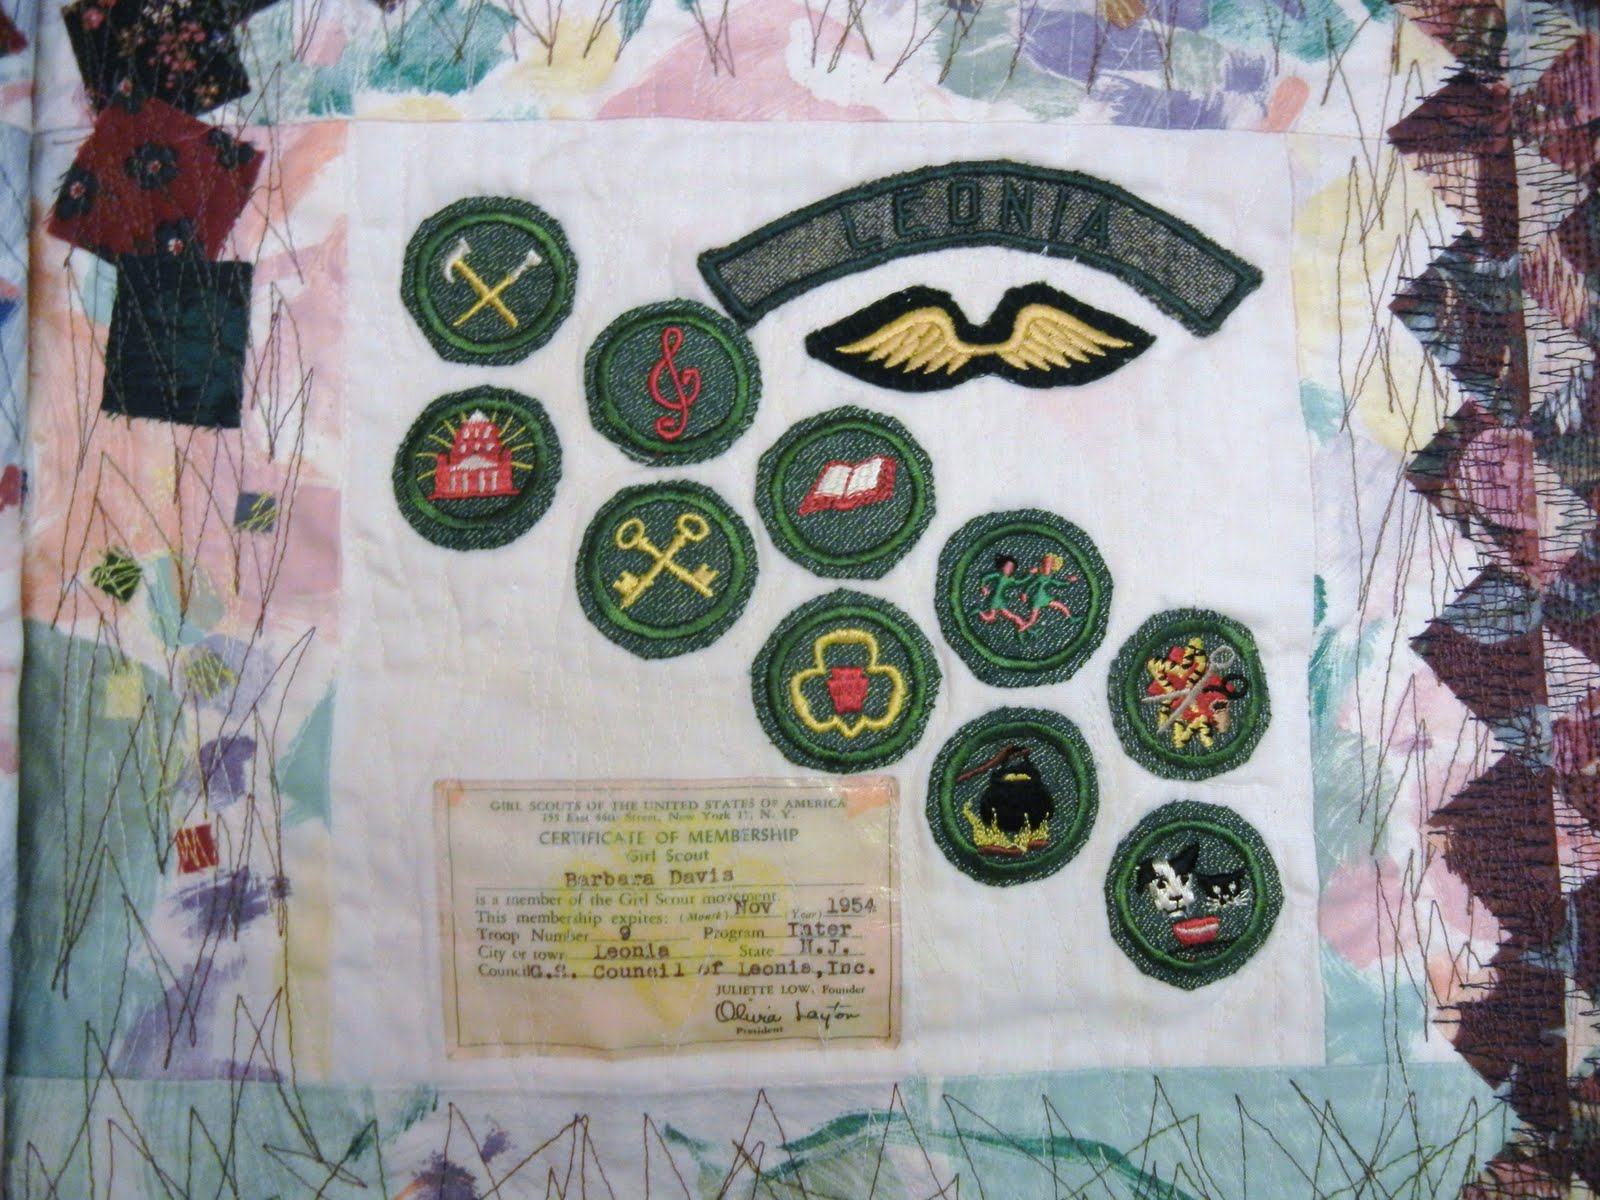
Mother's Day card and Girl Scout badges. 
 

Fabric crayons and heat transfer worked well to re-create the Mother's Day card I made when I was seven years old.


Girl Scout badges were sewed on and my membership card was photo transferred.  


 High school yearbook and wedding gown.


 A rubbing of the cover of my high school yearbook.


I took an 8" square of my wedding gown lace and painted it with acrylic paint thinned with water. This I placed face down on a piece of fabric and finger-pressed. I traced the figure from the original Vogue pattern, cut it out and fused it to the "new" lace fabric. The entire block was covered with organdy. The wedding gown was outlined with metallic thread. The bouquet was hand-embroidered. Still more to come . . .

Friday, June 24, 2011

When I Was 50 . . . .

. . . .I was a college student majoring in Studio Art and one of the courses I took was Surface Design. I was faced with the decision of what to make for my "project." Since I had turned 50 I wanted to do something special for myself and the idea of "Pages" came to mind. I selected events that were highlights of my life. This is the cover. I incorporated pieces of my wedding gown lace and peau de soie, added trims and buttons from my collection, used denim from my kids' blue jeans to make mountains, sewed on a bit of wool fabric from my dad's sport jacket, tacked on tatting made by my grandmother, and fused tear-drop shaped lavender flowers cut from fabric that I used to make a blouse for my mom when I was in high school. Yes, I had saved all these things!   


"Pages" on the left and footprints on the right.


I transferred xerox copies of flower images onto fabric using Judith Baker Montano's (author of the Art of Silk Ribbon Embroidery) method of laying the photocopy down on the fabric and rubbing the back of the image with a cotton ball soaked in turpentine. Once the paper became translucent,  it was time to rub the back of the image with the back of a spoon making sure to cover the entire area. Lift and voila! 


I ironed freezer paper to the back of plain fabric, put it in my typewriter and typed the "document." Using a Pigma Pen, I drew the lines, and wrote in the details--date, time, my parents' names, etc. I created footprints by making thousands of tiny dots with the tip of my pen. More to come . . . .